Step-by-Step Instructions
- **Prepare the Gingerbread Cake:** Preheat oven to 350°F (175°C). Grease and flour two 9-inch round cake pans, lining the bottoms with parchment paper.
- In a medium bowl, whisk together the flour, baking soda, ginger, cinnamon, nutmeg, cloves, and salt. Set aside.
- In a large bowl, cream together the softened butter and brown sugar with an electric mixer until light and fluffy. Beat in the eggs one at a time, then mix in the molasses until well combined.
- Alternately add the dry ingredients and buttermilk to the wet ingredients, beginning and ending with the dry ingredients, mixing until just combined after each addition. Do not overmix.
- Divide the batter evenly between the two prepared cake pans. Bake for 30-35 minutes, or until a wooden skewer inserted into the center comes out clean. Let cakes cool in pans for 10 minutes before inverting onto a wire rack to cool completely.
- **Prepare Gingerbread Decorations:** While cakes are cooling, prepare the gingerbread dough. In a large bowl, cream together butter and brown sugar. Beat in egg and molasses.
- In a separate bowl, whisk together flour, ginger, cinnamon, cloves, baking soda, and salt. Gradually add dry ingredients to wet, mixing until a stiff dough forms.
- Divide dough in half. Roll out one half on a lightly floured surface to about ¼-inch thickness. Use miniature gingerbread house and tree cookie cutters to cut out shapes. Place on baking sheets lined with parchment paper. Repeat with remaining dough.
- Bake gingerbread pieces at 350°F (175°C) for 10-15 minutes, or until edges are firm. Let cool completely on a wire rack.
- **Make the Royal Icing:** In a large, clean bowl, combine egg whites (or meringue powder + water), powdered sugar, vanilla extract, and cream of tartar (if using egg whites). Beat with an electric mixer on high speed for 7-10 minutes, until very stiff and glossy peaks form. If using meringue powder, follow package directions for stiff consistency icing. Transfer about ¼ cup of icing to a small bowl and thin with a few drops of water for outlining. Keep remaining stiff icing covered with a damp cloth to prevent drying.
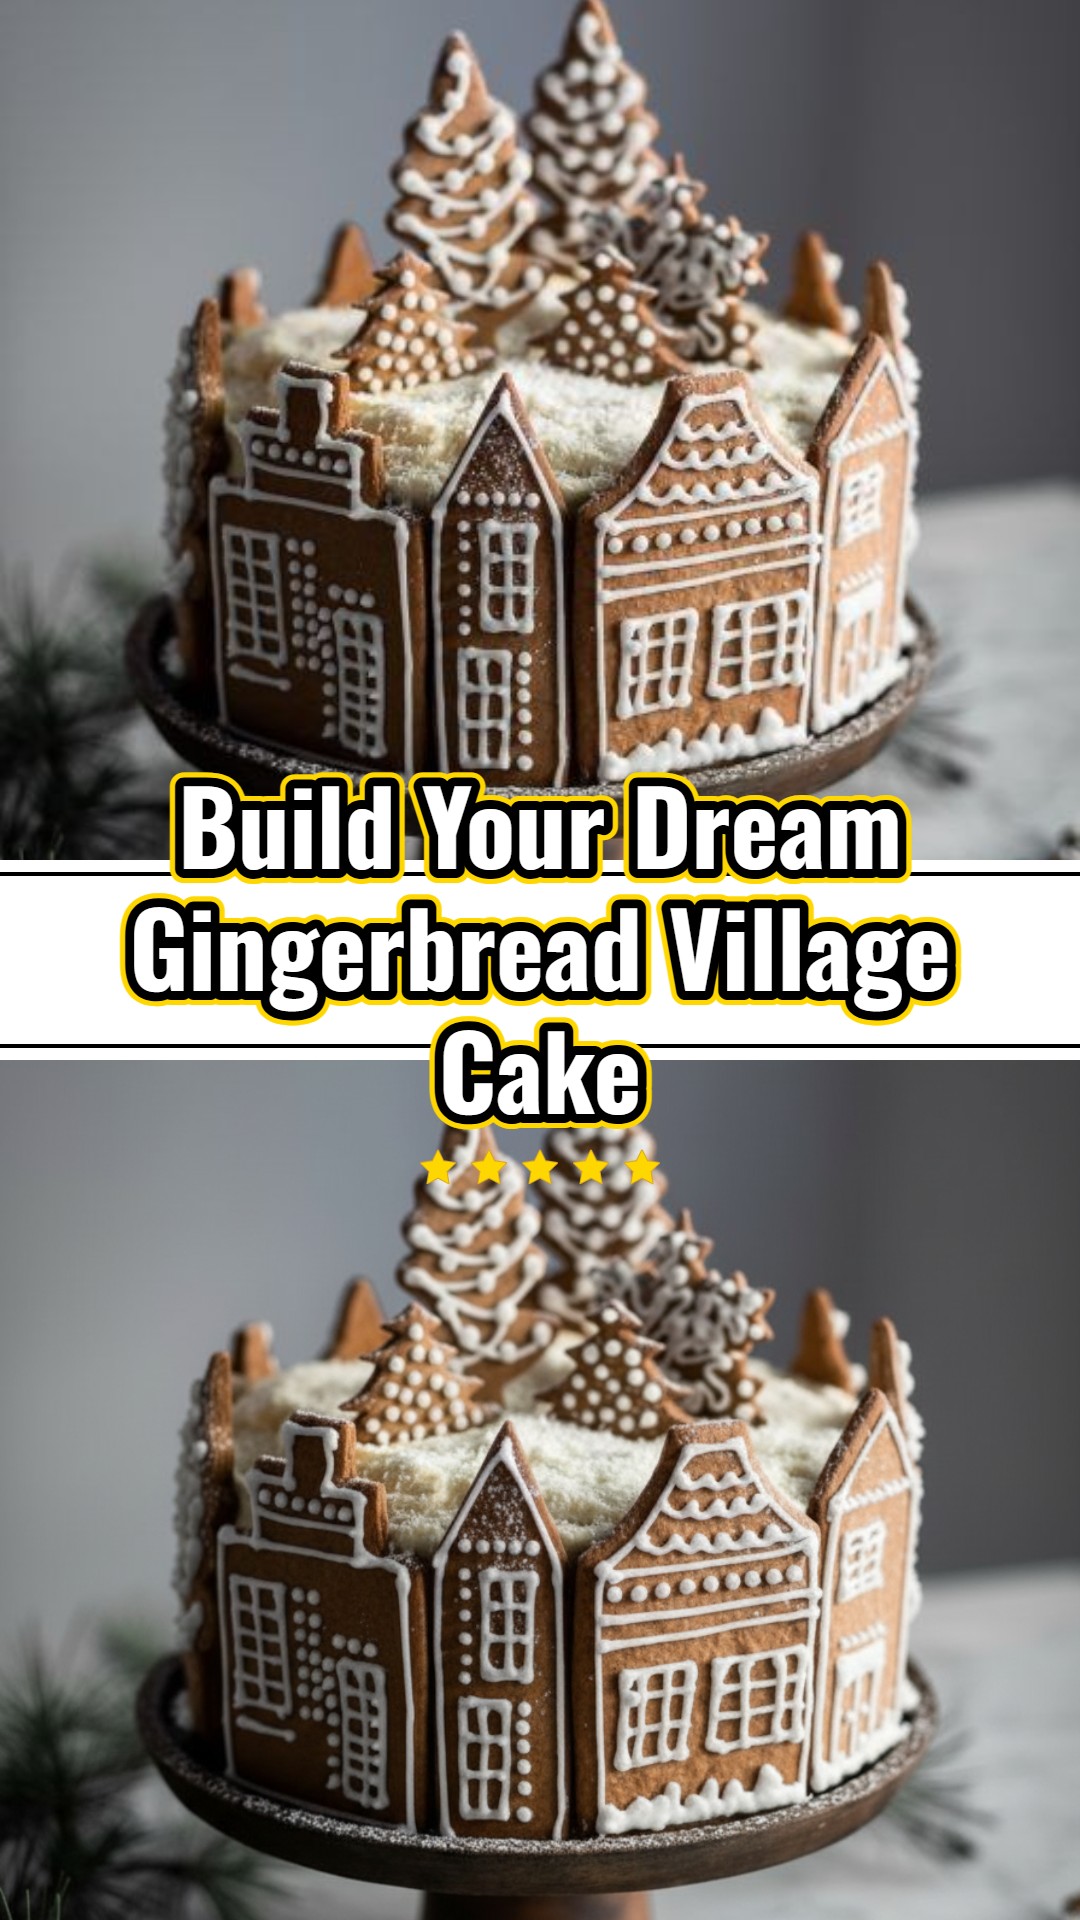
- **Decorate Gingerbread Pieces:** Using a piping bag with a small round tip and the slightly thinned royal icing, outline the gingerbread house and tree pieces. Let set for 10-15 minutes. Then, using thicker royal icing, fill in walls, windows, and roof details. Decorate with small candies and sprinkles as desired. Let all gingerbread pieces dry completely for several hours or overnight.
- **Assemble the Cake:** Once cakes are completely cool, level them if necessary. Place one cake layer on your serving plate or cake stand. Spread a generous layer of stiff royal icing on top. Place the second cake layer on top.
- **Crumb Coat & Final Icing:** Apply a thin layer of royal icing all over the cake (top and sides) to create a crumb coat. Chill in the refrigerator for 15-20 minutes.
- Apply a thicker, even layer of royal icing over the entire cake. Use an offset spatula to create a smooth surface or decorative swirls.
- **Create the Village Scene:** Arrange the dried gingerbread houses and trees on top of the cake. Use a dab of royal icing on the bottom of each piece to secure it. You can also place some pieces around the base of the cake on the cake stand.
- **Add Snowy Details:** Using a piping bag with a small round tip, pipe “snow” on the cake around the gingerbread pieces, creating paths or drifts. Pipe icicles or snow along the edges of the gingerbread roofs.
- **Final Touches:** Sprinkle shredded coconut around the base of the gingerbread pieces and on the cake surface for a snowy effect. Dust lightly with powdered sugar. Add any additional candies or edible Christmas toppers.
Full Ingredients
- 2 ½ cups all-purpose flour
- 1 ½ teaspoons baking soda
- 1 teaspoon ground ginger
- 1 teaspoon ground cinnamon
- ½ teaspoon ground nutmeg
- ½ teaspoon ground cloves
- ¼ teaspoon salt
- 1 cup (2 sticks) unsalted butter, softened
- 1 cup packed light brown sugar
- 2 large eggs
- ½ cup molasses
- 1 cup buttermilk
- 4 large egg whites (or 1 cup meringue powder + 6 tbsp water)
- 4 cups powdered sugar, sifted
- 1 teaspoon vanilla extract
- ½ teaspoon cream of tartar (if using egg whites)
- 1 cup (2 sticks) unsalted butter, softened (for gingerbread decorations)
- 1 cup packed light brown sugar (for gingerbread decorations)
- 1 large egg (for gingerbread decorations)
- ½ cup molasses (for gingerbread decorations)
- 3 cups all-purpose flour (for gingerbread decorations)
- 2 teaspoons ground ginger (for gingerbread decorations)
- 1 teaspoon ground cinnamon (for gingerbread decorations)
- ½ teaspoon ground cloves (for gingerbread decorations)
- ½ teaspoon baking soda (for gingerbread decorations)
- ¼ teaspoon salt (for gingerbread decorations)
- Assorted candies (gumdrops, M&M’s, sprinkles)
- Shredded coconut (for snow)
- Powdered sugar (for dusting)
- Christmas-themed edible toppers (optional)
Shopping List
Dairy & Eggs
- Unsalted butter (4 sticks total)
- Large eggs (3 total)
- Buttermilk (1 cup)
- Large egg whites (4, or meringue powder)
Pantry
- All-purpose flour (5 ½ cups total)
- Baking soda (3 teaspoons total)
- Ground ginger (3 teaspoons total)
- Ground cinnamon (2 teaspoons total)
- Ground nutmeg (½ teaspoon)
- Ground cloves (1 teaspoon total)
- Salt (¾ teaspoon total)
- Light brown sugar (2 cups total)
- Molasses (1 cup total)
- Powdered sugar (4 cups + extra for dusting)
- Vanilla extract (1 teaspoon)
- Cream of tartar (½ teaspoon, optional)
- Shredded coconut
Candy & Decorations
- Assorted candies (gumdrops, M&M’s, sprinkles)
- Christmas-themed edible toppers (optional)
Equipment Needed
- 9-inch round cake pans (2)
- Mixing bowls
- Electric mixer (stand or hand-held)
- Spatulas
- Parchment paper
- Cooling rack
- Piping bags with various tips (round, star)
- Small offset spatula or butter knife
- Rolling pin
- Gingerbread house cookie cutters (miniature set)
- Baking sheets
- Wire rack
Variations & Serving Ideas
This magnificent Gingerbread Village Cake is truly a centerpiece in itself, destined to be the grand finale of your most festive holiday meals. For an awe-inspiring presentation, display it proudly on an elegant cake stand, allowing guests to admire every charming detail of your edible village. Just before serving, a final, delicate dusting of powdered sugar will perfectly mimic freshly fallen snow, adding an extra touch of magic. While this cake is a rich and satisfying dessert on its own, a simple accompaniment like a scoop of creamy vanilla bean ice cream or a cloud of freshly whipped cream can beautifully complement its spiced flavors. To keep your masterpiece fresh, store any remaining cake in an airtight container at room temperature for up to 3-4 days. For extended freshness, it can be refrigerated, although the cake is best enjoyed within a few days for optimal texture and moisture.
We hope this Gingerbread Village Cake recipe inspires you to create your own enchanting holiday masterpiece this season! It’s more than just a dessert; it’s an opportunity to create cherished memories and a stunning edible display that will captivate all who gather around your table. We absolutely adore seeing your creative endeavors, so please share your Gingerbread Village creations and any personal twists in the comments section below! Your insights and unique designs truly inspire our community here at Kitchen Recipes. Happy baking and happiest of holidays to you all! #ChristmasDecorCake #FestiveCake #HomeCakeDesign #GingerbreadCakeDecoratingIdeas #XmasCakeDecoratingIdeas #ChristmasSpongeCake #GingerbreadDecoratedCake #GingerbreadVillageCake #ChristmasCakeDecoration